Introduction: Getting Lit Up About Fluorescent Light Fixtures
Being a DIY enthusiast, I've developed a knack for tackling various types of home repairs. Among these, troubleshooting and repairing fluorescent light fixtures hold a special place in my heart. Why, you ask? Because it's reminiscent of my early childhood when I would sit on the staircase, nose buried in a book, under the reassuring glow of our old fluorescent light. Each time it flickered and died, I felt a sense of loss. And when it was revived, my heart would revive with it. It was like a dance between light and darkness. Interesting, isn’t it?
Understanding the Fluorescent Fixture: What Can Go Wrong?
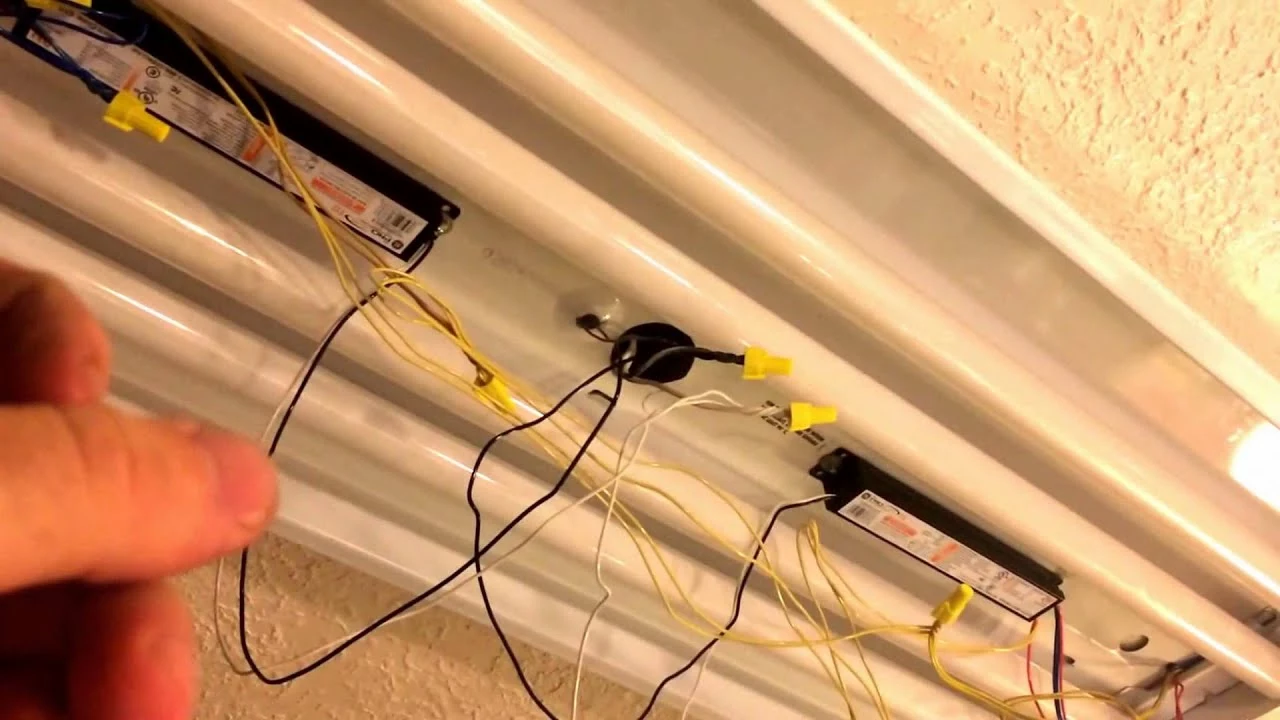
Before you dive into the repair, it’s important to have a basic understanding of the fluorescent fixture and its components so that you can know what exactly can go wrong. A fluorescent light fixture consists of a lamp, ballast, starter, and the fixture. As to the problems that can plague these fixtures, there's a whole smorgasbord. This could range from a simple blown-out bulb to more complicated issues such as a malfunctioning ballast or starter, faulty wiring, or less frequently, damage from power surges. I remember a great story where my buddy Jim and I replaced every component of a fixture only to discover the problem was a pesky short in the wiring. The wall's "tummy" had to be cut open for that surgery!
The Preliminaries: Getting Ready for the Job
Well, now that you’ve gotten a general idea of the potential problems, it’s time to move to the action stage. Start by ensuring that you have all the necessary tools—like a voltmeter, wire strippers, a pair of pliers, a screwdriver, and of course, your safety gear such as gloves and safety glasses. And do not forget to turn off the power supply before you start rifling around inside the fixture. That was a lesson I learned the hard way when I was just starting out. Sparks literally flew that day, folks!
Diagnosing and Troubleshooting: The Real Grit
As Sherlock Holmes once said, “Data, data, data! I can't make bricks without clay." The same applies to troubleshooting. Once you’ve your gloves on, start with the easiest option – the light bulb. A yellow or discolored bulb can be a signal of trouble. Give it a twist and try replacing it first. If that doesn’t solve the issue, use your voltmeter to check if the fixture is receiving power. If all is good on that front, then it's probably the ballast. I would generally recommend buying a new one than attempting a repair. Troubleshooting can feel like a giant maze, but with each effort, you're getting closer to the heart of the problem—and isn't that just like life itself?
Repairing the Fixture: The Sweet Victory
Now you've journeyed to the heart of the problem and it's time to repair. If the ballast needs to be replaced, disconnect it from the fixture and replace it with a new one, using wire strippers and pliers to connect the new wires. If it’s a faulty wiring issue, test the wires for continuity with a multimeter and fix any shorts or broken wires. If the fixture is damaged and beyond repair, then it's time for it to retire—just make it a good send-off as it's been spreading light all this while! Once your repair is complete, flip on the power supply and bask in the glow of your success.
Fluorescent light fixtures may be tricky pals, but with patience, effort, and a fair bit of humor, you can revive your temperamental light from its flickery demise to a steady glow. You will not only enlighten your house but also the darker corners of your wits and patience. Happy fixing!